RTX 5070 and RTX 5060 Ti Overclocking & Undervolting Guide with MSI Afterburner Part 1
Graphics Cards
So, you just installed a brand-new RTX 50-series graphics card and love the performance boost. But what if you could get more out of it?
That's the promise of overclocking: pushing your hardware beyond its default factory settings to gain higher frame rates and unlock an even smoother gaming experience.
If you're new to this, the very idea of "overclocking" could be intimidating. Concerns about potentially damaging your expensive new card, voiding your warranty, or dealing with constant system crashes are completely valid.
However, we’re not chasing world records or pushing your GPU to its absolute breaking point in this guide. Instead, we’re going to walk you through a safe, simple, and stable overclock using MSI Afterburner.
The goal here is a modest, but noticeable performance boost that should work for most RTX 50-series cards without putting your hardware at risk. We'll demystify the process and show you how to safely unlock that extra potential, step-by-step.
- Overclocking Basics: The Key Terms You Need to Know
- Setting up MSI Afterburner: Interface, Settings, and More
- A Simple First ‘Overclock’: Power and Voltage Limit Tuning
- Manual Overclocking: Advanced Tweaking
- Stability Testing: It’s Time to Test
- The Simple Undervolt: Scaling Back Power Limits to Save Power and Reduce Temperatures
- Advanced Tuning: Dialing in an Undervolt Using the Afterburner Curve Editor
- Advanced Undervolt Strategy #1: Default Clocks, Lower Voltage
- Advanced Undervolting Strategy #2: Much Lower Voltage, Much Reduced Frequency
- Apply at Windows Startup: Balancing Convenience and Stability
- Overclocking or Undervolting or a Bit of Both: Take Your Pick
Watch MSI Afterburner Walkthrough
Overclocking Basics: The Key Terms You Need to Know
Before we get into MSI Afterburner, there are a few terms you should know and understand. It’ll give you a better idea of exactly what we’re changing and the rationale behind them.
The Voltage-Frequency (VF) Curve
Every GPU operates along something called a voltage-frequency curve. Think of it as a set of rules programmed into your card from the factory. This curve dictates the voltage required for the GPU to run at a specific clock speed (frequency) without sacrificing stability.
In simple terms:
Higher Frequency = More Voltage Needed
When we overclock, we’re basically telling the GPU to run at a different (higher) frequency than the manufacturer's default settings.
To keep it stable at that higher clock speed, we often need to supply it with a little more voltage. Our goal is to find the highest stable frequency for the lowest possible voltage, without pushing it too far.
MSI Afterburner gives you easy, direct access to manipulate this curve to your liking.
The "Silicon Lottery"
This is a term you'll find everywhere in overclocking communities.
Even though two graphics cards might be the exact same model (e.g., two MSI RTX 5080 GAMING X TRIO), the silicon chip at the heart of each one is unique. Due to microscopic imperfections during the manufacturing process, some chips are better at staying stable at higher frequencies than others.
A "golden chip" might be able to reach very high clock speeds without needing much extra voltage.
On the flipside, a regular chip might require a lot more voltage for even a small overclock, or it may not be able to overclock much at all.
This variation is called the "silicon lottery." You never know how good your specific chip is until you test it. This is the main reason why your overclocking results may be different from someone else's, even with identical hardware.
Your Mileage May Vary (YMMV)
Crashing your system (sudden reboots, blue screens, etc.) during overclocking is a perfectly normal part of the process – it’s how you find your card's stability limit.
This guide is designed to provide a safe and reliable starting point. Keep in mind that we’re not offering magic numbers to be copied and pasted. Instead, we’re focusing on teaching you how to fish, explaining the process of safely exploring your own card's limits.
Because of the silicon lottery, it is important to understand that the settings that work for one card might not work for yours.
Although the values we use here are conservative and tested extensively, your mileage may vary when it comes to getting a perfect, stable overclock for your specific GPU.
Setting up MSI Afterburner: Interface, Settings, and More
Now that we understand the basics, let's get MSI Afterburner ready. This involves familiarizing yourself with the interface and tweaking a couple of important settings to unlock the full potential of the tool.
The User Interface: Picking a Skin
When you first launch MSI Afterburner, its appearance can vary depending on the version and selected "skin."
Skins are different visual themes that change the layout and look of the program. For this guide, we’ll be sticking with the default MSI Windows 11 Dark skin by Drerex Design.
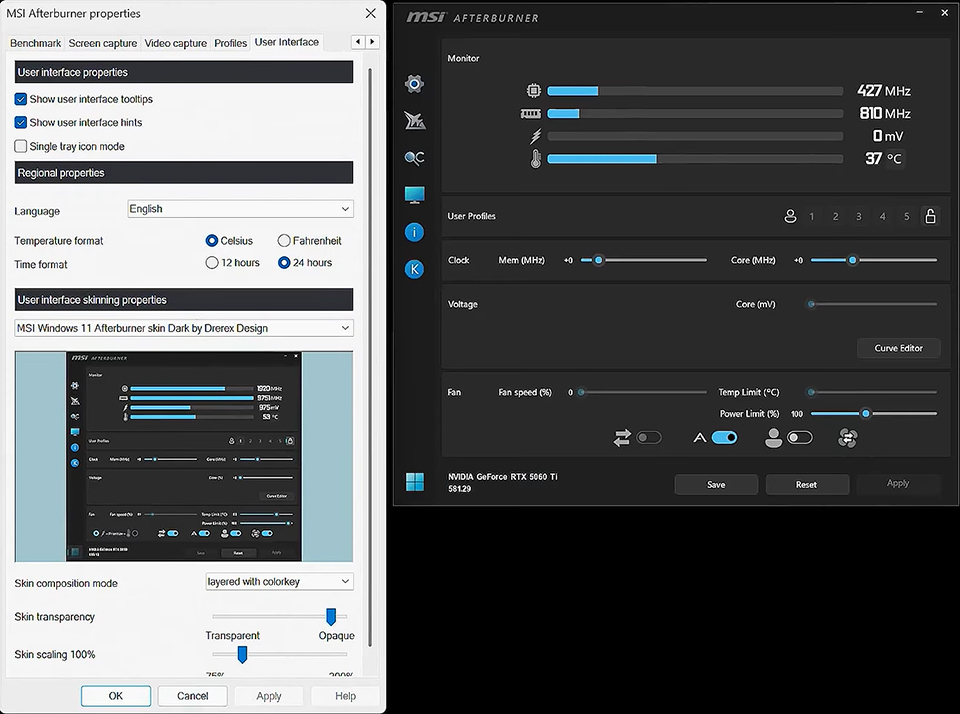
If your Afterburner looks different from the screenshots below, you can easily switch skins to follow along more closely.
To do this, follow these steps:
- Click the ‘Settings’ cog icon on the left bar.
- Navigate to the User Interface tab.
- Under the "User interface skinning properties" dropdown menu, select the "MSI Windows 11 Afterburner skin Dark by Drerex Design".
Afterburner Settings: Unlocking Voltage Control and Setting up Monitoring
Before we can get to ‘overclocking’, we need to find and enable a few important settings.
- Click the ‘Settings’ cog icon to open the properties window.
- It should open to the General tab, if not, find it and click on that tab.
- In General, under "Compatibility properties," check the boxes for:
- Unlock voltage control
- Unlock voltage monitoring
- Unlock voltage control
- Click Apply. Afterburner will need to restart to apply these changes.
Enabling these options gives us the necessary control over the GPU's voltage to get our overclock going.
Optional: Setting Up the On-Screen Display (OSD)
While not required, setting up the On-Screen Display (OSD) is highly recommended. The OSD allows you to see vital statistics like your GPU's clock speed, temperature, and power usage in real-time while you are running a game or a stress test.
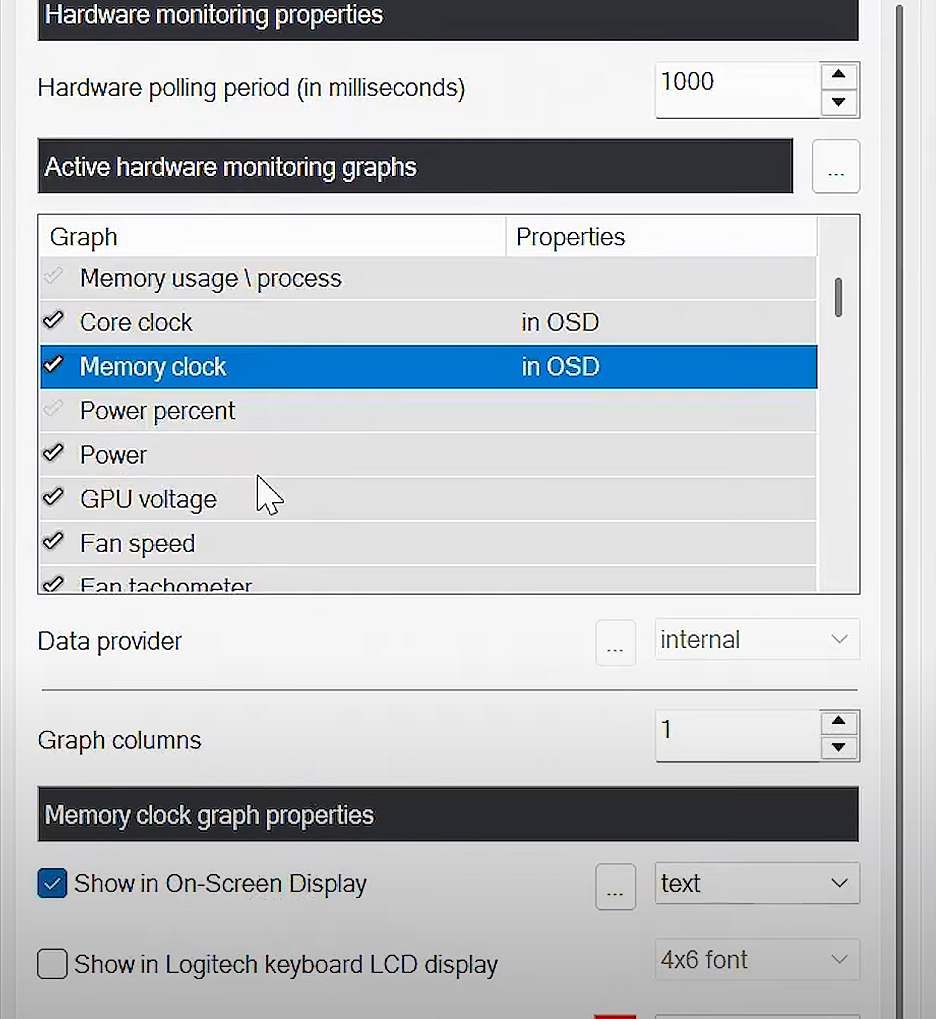
This is incredibly useful for monitoring the stability and impact of your changes.
To set up your OSD:
- Go back into the Settings menu.
- Click on the Monitoring tab.
- In the "Active hardware monitoring graphs" list, click on a metric you want to track (e.g., GPU temperature, Core clock, Power, Framerate).
- Once a metric is highlighted, check the "Show in On-Screen Display" box below the list. You will see "in OSD" appear next to the item in the list.
- Repeat this for every metric you want to monitor.
- When you're finished, click Apply.
Again, this is a completely optional step, but having this real-time data makes the process of finding a stable overclock much easier.
A Simple First ‘Overclock’: Power and Voltage Limit Tuning
The easiest way to get a quick and safe performance boost is to simply give your GPU more to work with.
By default, these power and voltage limits are set quite conservatively. Our first step will be to raise them. This process lets the card boost itself as high as it safely can within the new limits you provide.
Keep in mind, that the GPU is still using the manufacturer’s voltage curve so all we’re doing here is extending the upper limits.
Now, start a Benchmark or Stress Test because we need to put the GPU under a consistent load to see the results in real-time. You can use a tool like MSI Kombustor (launched by clicking the 'K' icon in Afterburner if you have Kombustor installed) or you can just run a demanding game in windowed mode.

Make a note of the core clocks and voltages you see in MSI Afterburner just to keep track of your default performance.
Increase the Power Limit: In Afterburner, find the Power Limit (%) slider. Drag it all the way to the right to its maximum value. On our RTX 5060 Ti, for example, it goes up to 122%.
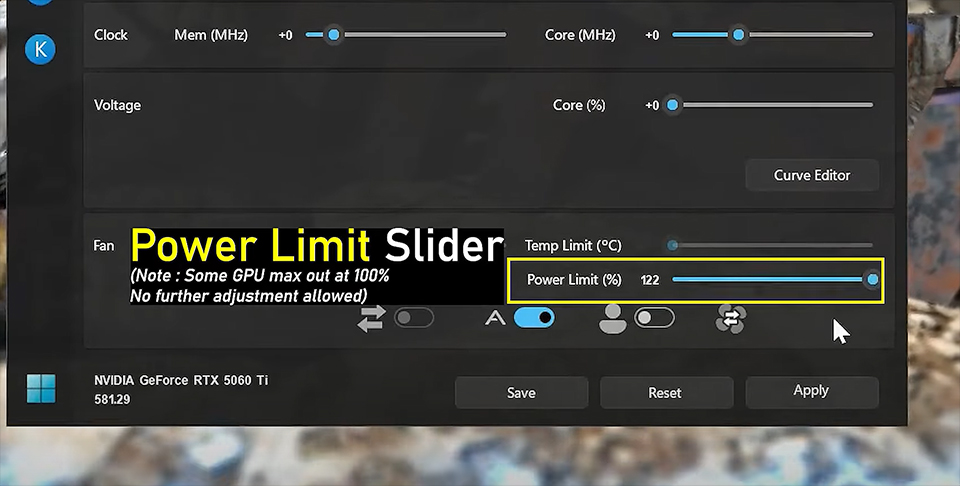
Now, check the performance increase you get from just raising power limits by clicking the Apply button (bottom). On our graphics card, we get a modest 23 MHz clock speed bump with a 15mV increase to voltage.
Increase the Core Voltage: Right below the clock sliders, you’ll find the Core Voltage (%) slider. Drag this all the way to its maximum value, which is typically +100%. Note that this doesn’t mean you’re doubling the voltage; it simply unlocks the highest voltage level approved by the card's manufacturer for safe operation.
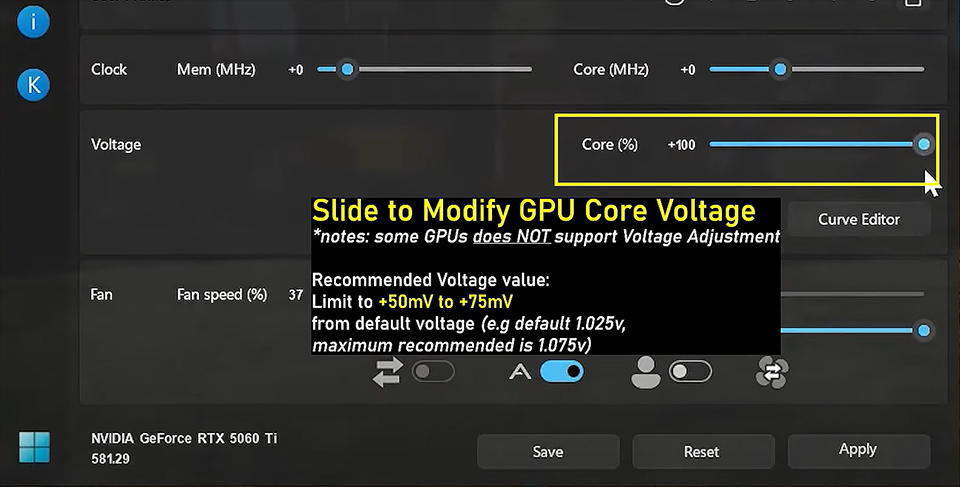
Apply Your Settings: Click the Apply button (the checkmark) to confirm the changes.
As soon as you apply these settings, you should see your GPU's performance numbers change in the On-Screen Display and within MSI Afterburner.
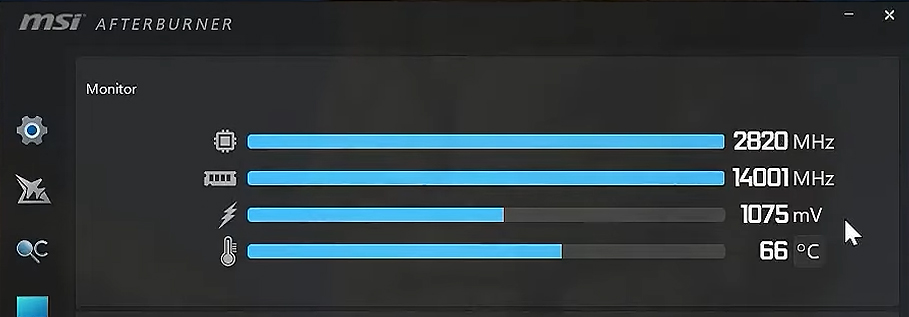
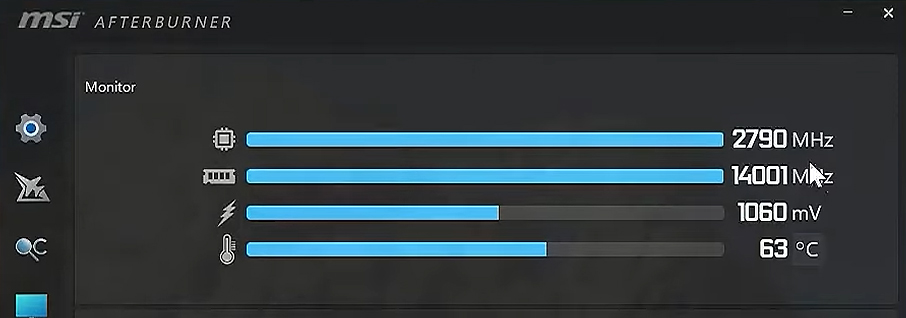
Before: The card was running at around 2760MHz, drawing about 1.045V and consuming 166W of power.
After: With the limits raised, the GPU automatically boosted itself to 2820 MHz by using a higher voltage of 1.075V (1075mV). In our Kombustor OSD, we get a power draw of around 181W (you’ll see your power draw in Kombustor’s OSD only if you followed the optional step in the previous section).
By simply moving two sliders, you've allowed the GPU to achieve a higher stable clock speed without too much effort. This is the simplest form of overclocking and provides a modest but "free" performance uplift.
The trade-off here is increased power consumption and slightly higher temperatures, but it's a great and safe way to start.
Manual Overclocking: Advanced Tweaking
At this stage, it’s important to keep track of your temperatures. Your Graphics Card’s cooling needs to keep up with these higher temperatures when under load.
If after the previous step, your GPU temperature is still under 75C, you can continue the journey!
But just in case, it’s a good idea to take over manual control of your fans to run them just a bit faster.
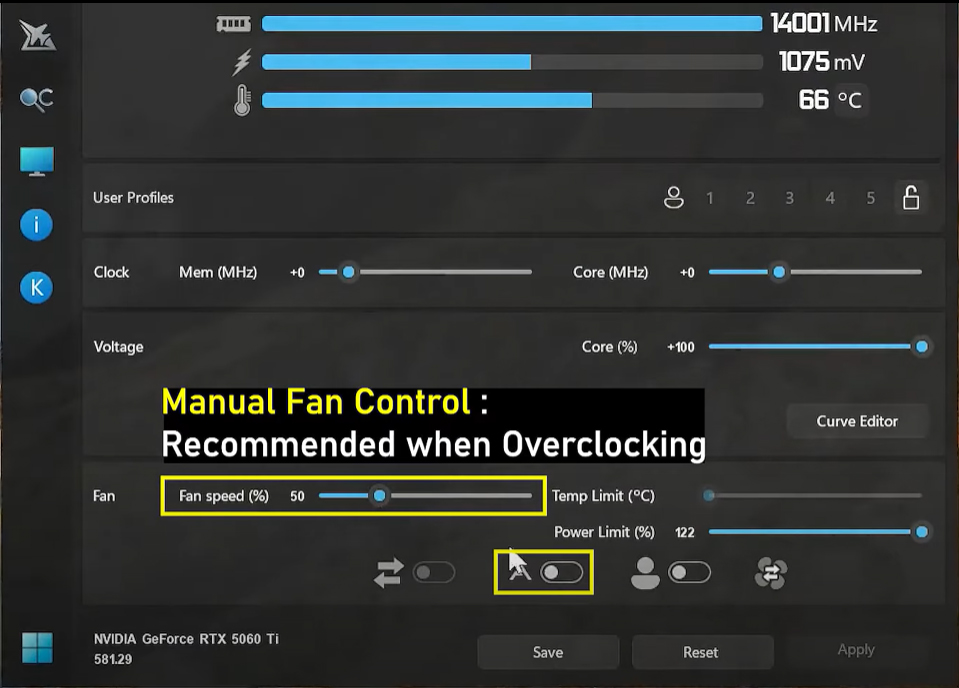
We’ll be setting it to 50% since the MSI graphics card we’re using can handle a lot of heat without too much fan speed. However, your mileage may vary depending on the card model you’re using, so make sure you’re monitoring your temperatures.
Next, let’s start increasing the Core Clock in 50MHz increments. Make sure you keep track of every time you change this value and hit ‘Apply’ so you remember at what point your GPU was still stable.
Tip: You can click the number next to the “Core (MHz)” label to input values directly.
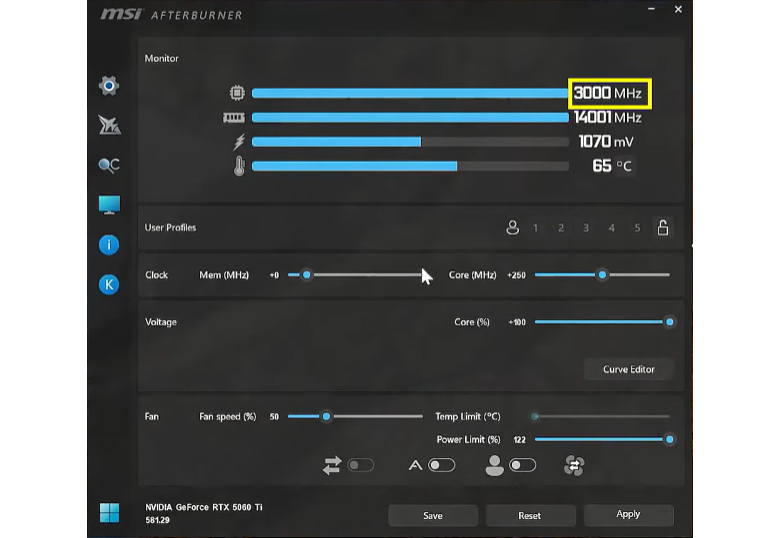
Now, our GPU handles Kombustor fine until we hit +400 MHz. Keep in mind that you could hit your OC limit either earlier or later, and if your system freezes and Kombustor crashes when you do, it’s perfectly normal.
Relaunch Kombustor and input your last set of stable values into Afterburner.
If it crashed at +400, for example, it’s a good idea to back off by around 100 to 150MHz to ensure stability.
Next, let’s deal with the Memory Clock (Mem).
Again, with Kombustor running, start incrementally adjusting your Memory Clock by around 100Mhz each time. Keep track of where you start to see crashing or other signs of instability.
Stability Testing: It’s Time to Test
Now that you’ve found a stable overclock for your GPU, it’s time to assess stability. It’s recommended to let these tests run for a few hours so you can make sure you don’t see any instability when using your system.
For example, you could leave Kombustor or Furmark running on loop, trigger game benchmarks one after another, etc.. We’ll go over stability in more detail in Part 2 of this series, where we’ll cover undervolting and more advanced methods of fine-tuning your GPU to get the best possible efficiency out of your graphics card, while maximizing performance.
Greatly appreciated Alva Jonathan’s collaboration with MSI. If you want to know overclocking with a more comprehensive step-by-step, go check out his YouTube channel here: https://www.youtube.com/@Luckyn00bOC